2 to 6 Image 3D Stereo into Lenticulars Tutorial
Preparing your files depends on what source of 3D images you are using. All images for all 3D sources need to be in digital form. We do NOT accept film or film negatives anymore. We don’t know of anywhere else that does 3D printing from film. However, all is not lost. You can get 3D prints from digital scans of your film.
Read below to see how to prepare your files depending on your 3D source. After looking at how your source is prepared then go to “Send Finished Files” to see how to send the prepared files to us.
Fuji 3D Digital camera W1 or W3
We specialize in making 3D prints from the Fuji 3D digital camera in the 4”H X 6”W size. This matches the landscape mode shape of the camera image. All you do is send us the mpo file that is made in the camera. We then prepare the file for printing from that. As an alternative you can send us a left and right jpg image instead. You do not need to rename the file.
For only 2 images from the Fuji you cannot have an 8 X 10 or larger print on the 60 LPI material as it is not enough images to give a smooth 3D effect.
2 Image Digital Sources (Cameras and Scans)
These can be from 2 lens cell phone cameras, twin digital camera rigs, computer generated files, digital scans of the following: old Stereoview cards, Viewmaster images, Realist format 5P slides, European format 7P slides, RBT 2 lens slides, Sputnick and medium format 2 lens cameras. This is not a complete list but just gives you an idea of how many 2 Image sources exist.
Label your image files “Name-L” and “Name-R”. We will take your files and try to best fit it into your desired print size of 4”H X 6”W or 8”H X 6”W. If your image is portrait mode (taller than wider) and you want a 4”H X 6”W size we will try to put 2- 4”H X 3”W images on a single print to best utilize the space. For only 2 images you cannot have an 8 X 10 or larger print on the 60 LPI material as it is not enough images to give a smooth 3D effect.For good resolution make the file height between 600 and 2000 pixels in RGB mode. We are flexible about this but we don’t want files that are either too small or too large for effective printing. When in doubt or if you have other questions contact us at info@snap3d.com
3, 4 and 5 lens film cameras
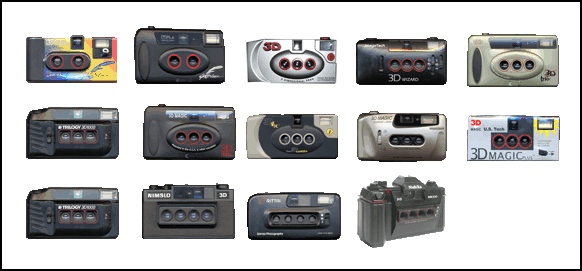
Even though we don’t print directly from film anymore, the film can be scanned and made into a digital file which we do print from. Below is a picture of 3D film cameras that are applicable:

Scanning the film
The scanning can be done at your home if you have a good scanner and the right holders for mounting the film. The film can also be scanned at a good film lab. If you live in a large city there should be a film lab that does scanning services near you. Sometimes Walmart will develop raw cassettes of film and make a CD at the same time. In general, you have ½ frame negatives. Tell your lab about this before scanning or take your camera to them to show them along with your film. If there is nowhere near you that can do it, you can mail your negatives to another city to have them scanned. These scanning instructions apply to slide film as well as negative film.
For 3 lens cameras label your image files “Name-L1”, “Name-2” and “Name-R3” for each lens. For 4 lens cameras label your image files “Name-L1”, “Name-2”, “Name-3” and “Name-R4” for each lens. For 5 lens cameras label your image files “Name-L1”, “Name-2”, “Name-3”, “Name-4” and “Name-R5” for each lens. If all your images are scanned on a single file then just name the file and we will separate the individual frames. We will take your files and try to best fit it into your desired print size of 4”H X 6”W or 8”H X 6”W on 179 LPI material or 8”W X 10”H (or larger?) on 60 LPI material. See “Price List”
In general your image is portrait mode (taller than wider) from the 3 and 4 lens film cameras and if you want a 4”H X 6”W size we will try to put 2- 4”H X 3”W images on a single print to best utilize the space. For good resolution make the file height between 600 and 2000 pixels in RGB mode. We are flexible about this but we don’t want files that are either too small or too large for effective printing. For 8 X 10 and larger prints the resolution should be 2000 pixels ideally. When in doubt or if you have other questions contact us at info@snap3d.com
Sizes of Prints
For 2 image sources the sizes are 4”H X 6”W and 8”H X 6”W on the 179 LPI material.
For 3 to 6 images the sizes are 4”H X 6”W and 8”H X 6”W on the 179 LPI material and also 8 X 10 and a bit larger on the 60 LPI material.
See “Price List”.
Custom Work
For those of you that like to add artistic input to your images, we encourage you to create your own files that fit our print sizes. For instance you could add text to your image or change the color. Pick your own focal point and custom crop your image. You could mix 3D and animations on the same print and then cut out afterward with scissors. 3D should be upright while animations are turned 90 degrees sideways. On a 8”H X 6”W print you could make some custom 3D business cards along with a 4”W X 6”H 3D print. If you have any questions, please contact us at info@snap3d.com
Extra Services
If you want custom work done but don’t have the time or the expertise to do it yourself, we can provide services such as adding text, mixing small and larger images on a single print etc. Tell us what you want done and we can provide a quote for doing the work. Our service cost is competitive. For instance adding simple text to a file is about $10. The file with text is then sent to you for future reprints. Other services cost as the time and effort dictate to manipulate your images.
Single lens camera digital sources.
Ironically you can take 3D pictures with only a normal single lens camera or cell phone and have them made as 3D lenticular prints using our service.
One way is called the cha-cha method. You take a picture of a scene that is quite stationary (nothing moving fast) and then move about 3” to the left or right and take another picture. You try to hold the camera as steady as you can when moving to the second shot, compose it the same as the first, don’t zoom, tilt high or low and not rotate the camera. You then send us both images and we align and print them to make a 3D picture.
Another way is to mount your normal one lens camera on a tripod and slide bar and take multiple shots moving the camera just about 1/2 “ sideways per shot. This is good for non-moving images such as statues, houses etc. Send us the series of shots and we can make a 3D print.
Finally you can take animation images that move when you turn the lenticular print by using a single lens camera on a tripod and taking multiple pictures of something moving (like a dog jumping, couple kissing etc.) without moving the camera and the background stays steady. See Animation Tutorial. You then send us the different image files and we can print it.

